Troubleshooting
Frequently asked questions
What should I do about requests with the cancellation failed status?
The payment method shows as unknown and the refund stays unpaid
Cancelling orders paid by convenience store deferred payment fails
Which order statuses can be cancelled for each integration?
The order statuses that can be cancelled differ depending on the system you have connected.
| Integration | Cancellable statuses |
|---|---|
| Shopify | Unshipped orders only. Orders that are even partially shipped cannot be cancelled. |
| CROSSMALL | Processing phases assigned to "Preparing for shipment" in Order status mapping, excluding those listed in Excluded order statuses |
| LOGILESS | All order statuses except in shipping progress, shipped, and cancelled |
| NextEngine | Statuses up to "waiting for delivery note printing" |
| ecforce | Order statuses assigned to "processing" in Order status mapping, excluding those listed in Excluded handling statuses |
| ecbeing | Unshipped and not yet cancelled orders only |
※With every integration, orders past the cancellation deadline cannot be requested (see 2-5. Cancellation deadline settings).
Can I approve cancellation requests manually?
Manual approval is not supported. Cancellation requests are either approved automatically or rejected automatically, based on the conditions you configure.
If there are requests you do not want to approve, set up automatic rejection conditions in your cancellation policy (time elapsed since the order, specific product or order tags, discounts applied, and so on).
How do I read the cancellation requests screen?
Open Cancellation management in the left menu of the admin dashboard to see the list of cancellation requests. Each request is one row, showing the request ID, request date and time, customer, cancelled items, statuses, and refund method. Click a row to open the details, where you can see the items, the refund breakdown, and the handling history.
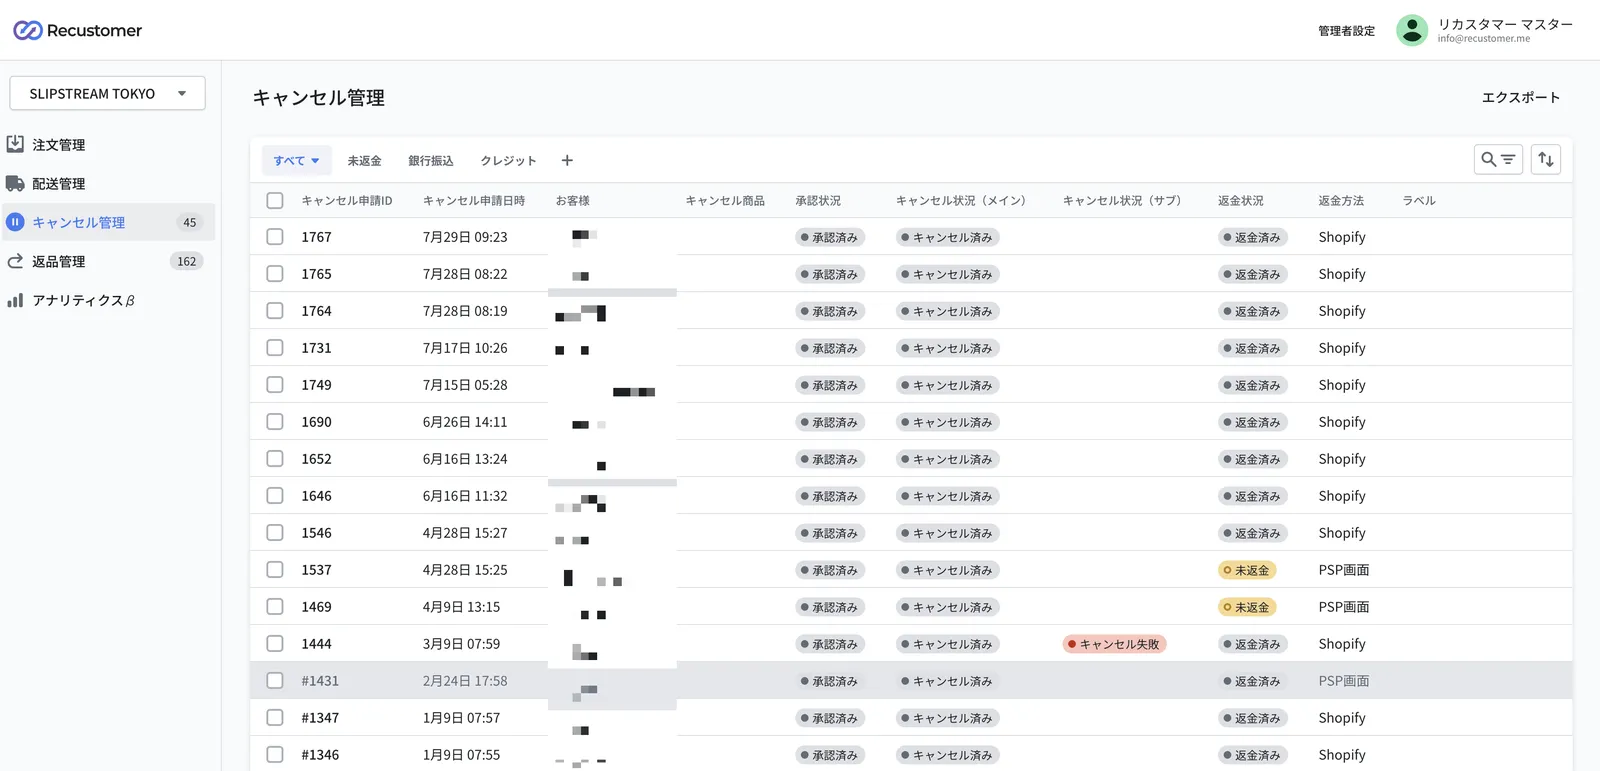
What the main statuses mean
| Column | Status | Meaning |
|---|---|---|
| Approval status | Approved | Met the cancellation policy conditions and was approved automatically |
| Cancellation rejected | Rejected automatically by the cancellation policy | |
| Cancellation status (main / sub) | Not cancelled | The cancellation has not yet been sent to the connected system |
| Cancelled | The cancellation in the connected system completed | |
| Cancellation failed | The cancellation in the connected system failed (see What should I do about requests with the cancellation failed status?) | |
| Refund status | Unpaid | The refund to the shopper has not completed |
| Refunded | The refund completed | |
| Refund rejected | Processed as not to be refunded |
"Main" is the result for the integration set as the main cancellation target, and "sub" is the result for the integration set as the sub cancellation target.
How do I export cancellation requests?
Follow these steps to export cancellation requests.
Click Export at the top right of the cancellation management list

Choose what to export and whether to include archived requests
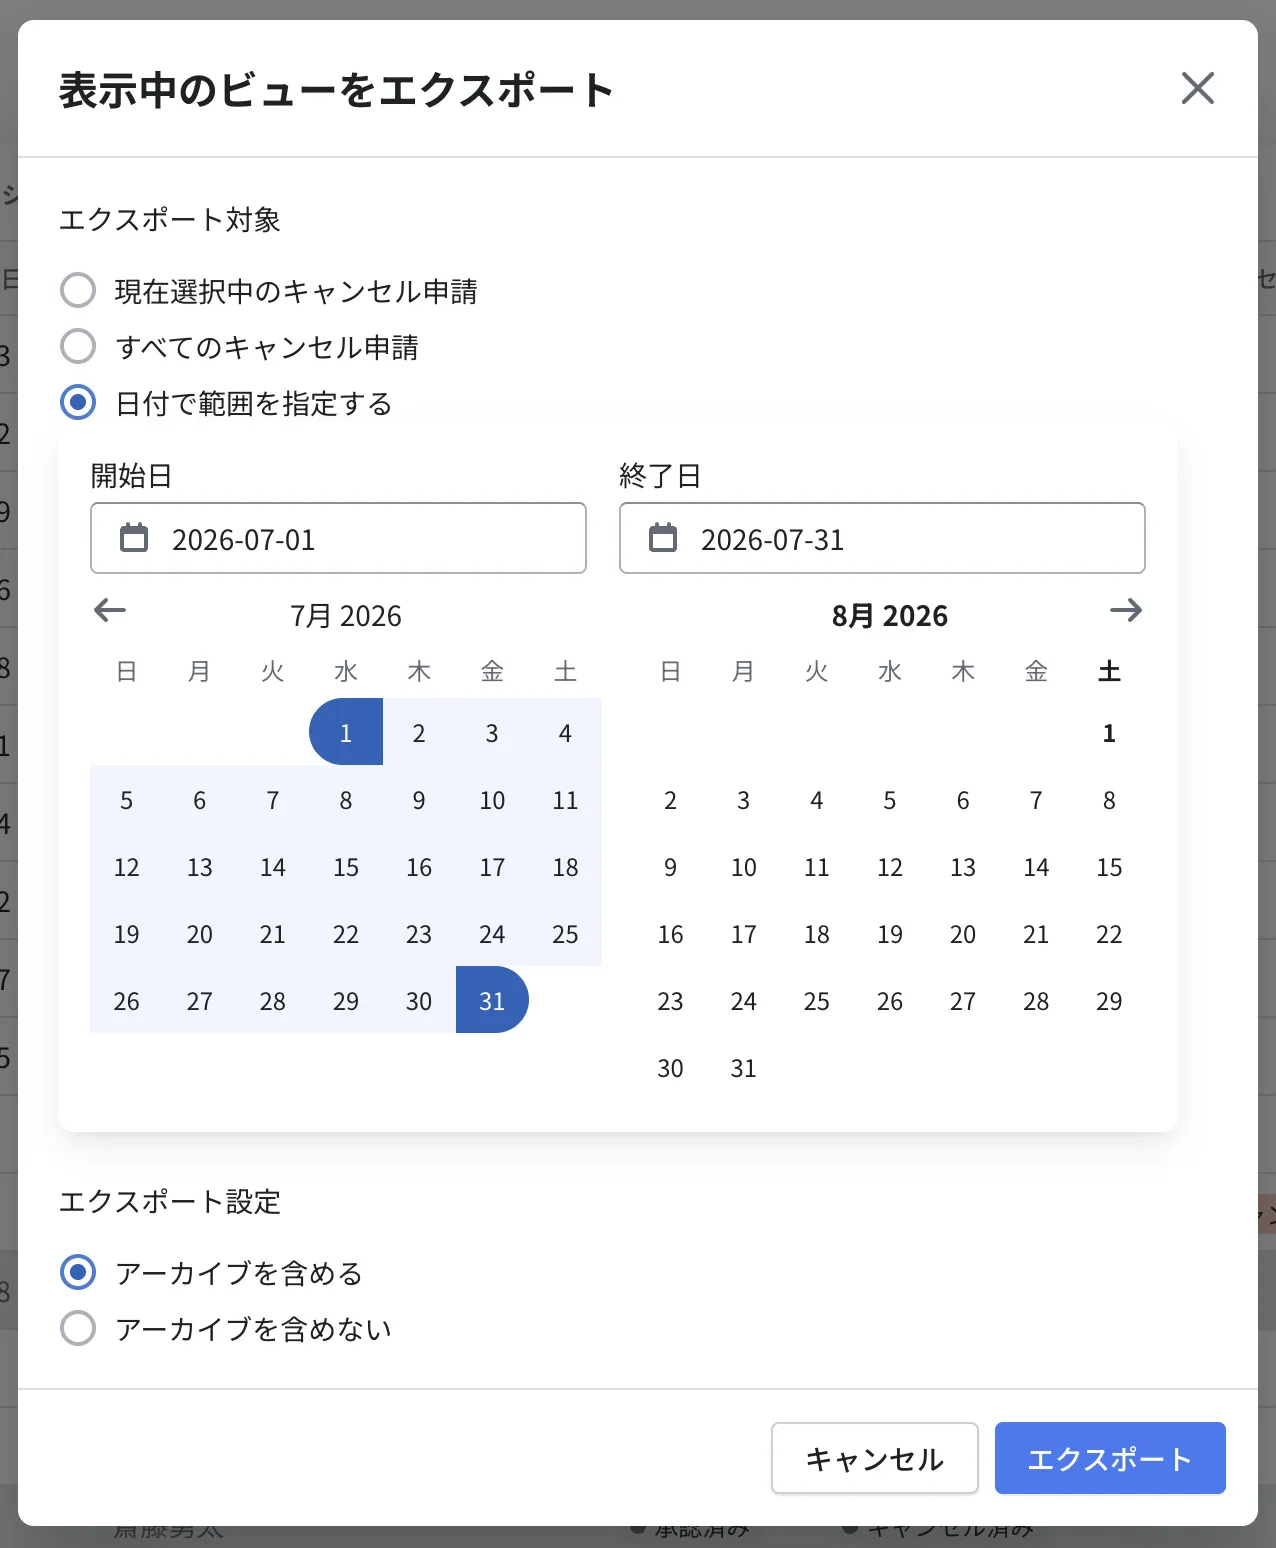
Click the Export button
An email titled "Cancellation data export" is sent to the email address of the person who ran the export. Download the CSV from the Download button in that email while signed in to the admin dashboard (the link is valid for 30 days).
Exported fields
The following 11 fields are always exported (you cannot choose which fields to include).
Recustomer ID / order number / cancellation request ID / request date and time / requester name / requester email address / cancellation reason / cancellation approval status / cancellation status (main) / cancellation status (sub) / cancellation refund status
Notes
Filtering by status or refund method is not applied to the export. To export only requests with a particular status, filter the list, tick the rows you want, and choose "currently selected requests".
You can export up to 10,000 requests at a time. If you have more, split the period using "specify a date range".
What should I do about requests with the cancellation failed status?
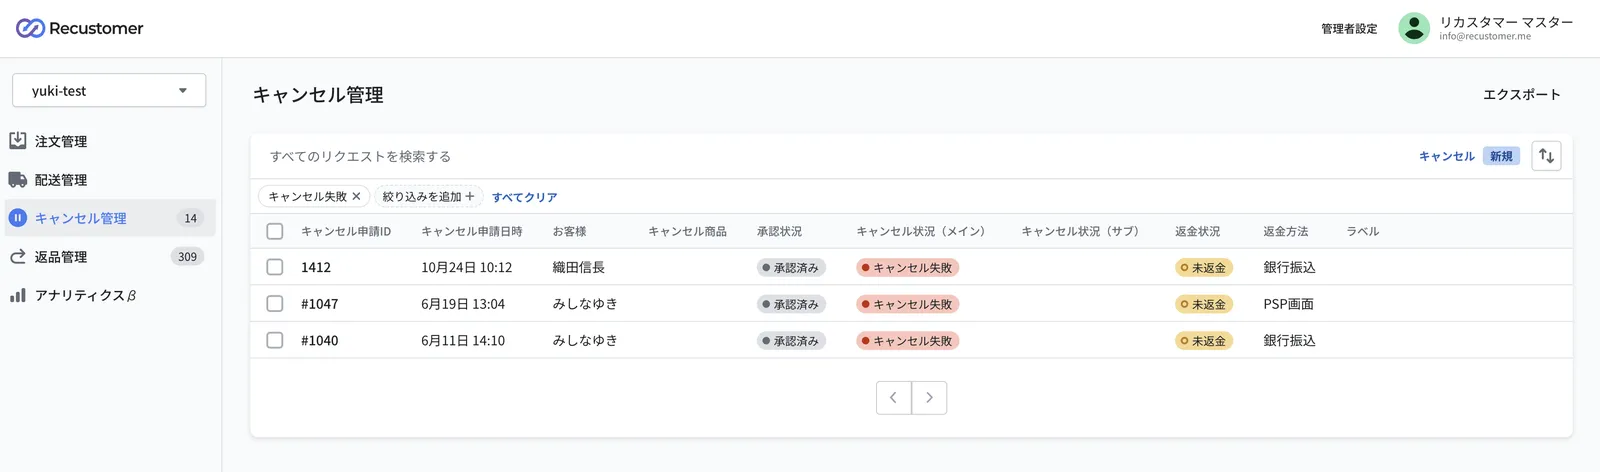
When sending the cancellation to the connected system fails, the request remains in the admin dashboard with the cancellation failed status. Filter the cancellation status by "cancellation failed" in the request list to see only the failed requests.
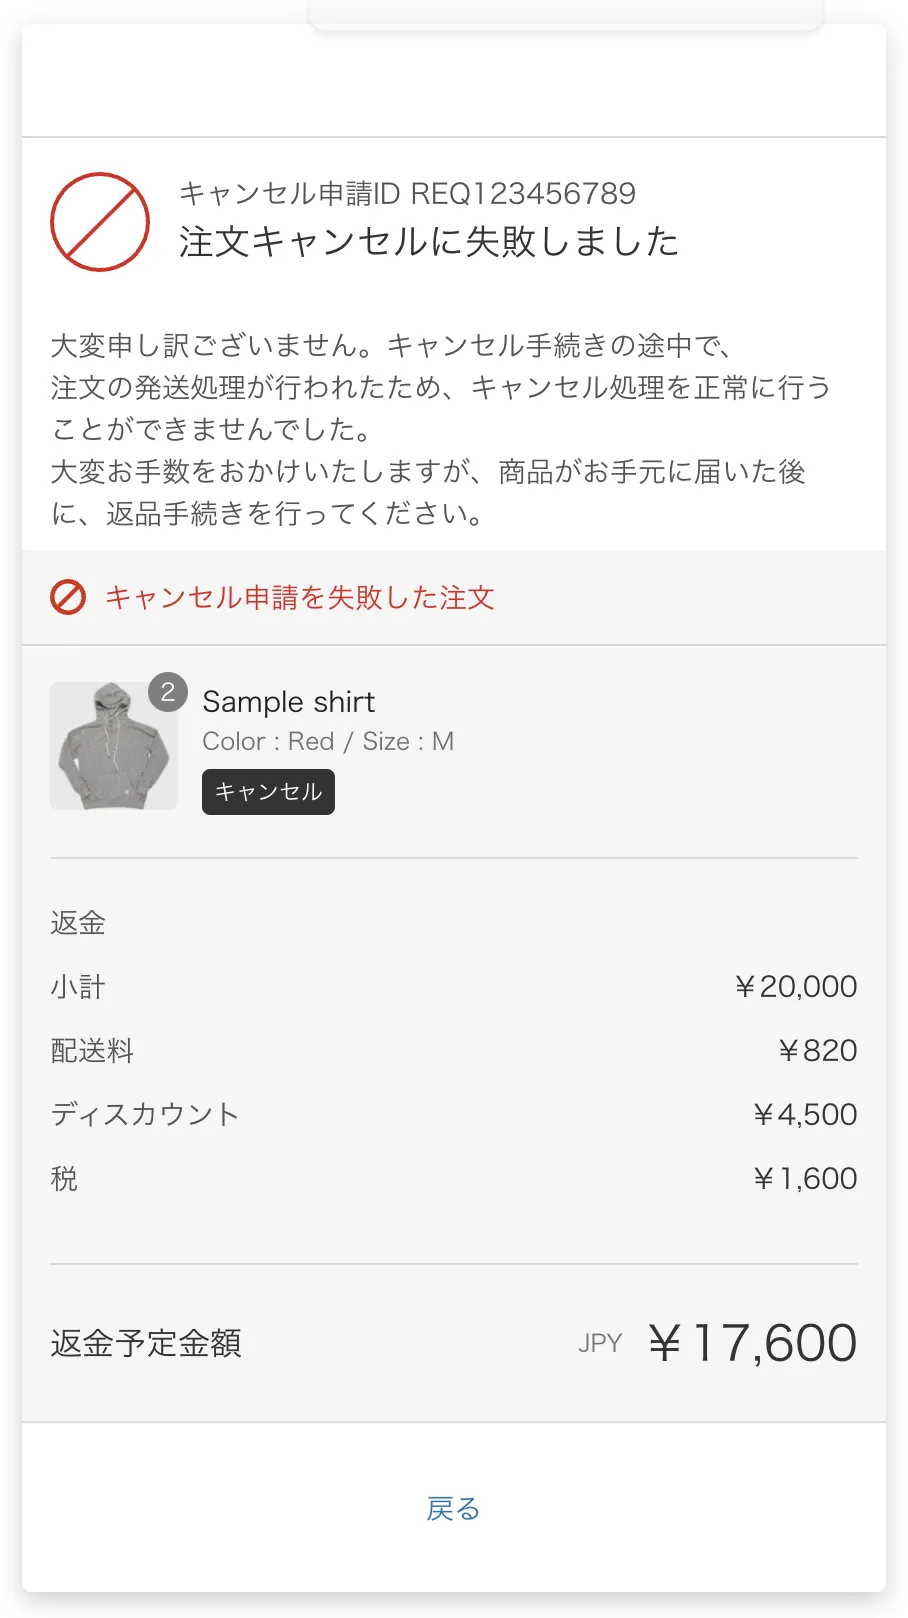
What the shopper sees
Right after the request, the completion screen tells the shopper that the order could not be cancelled (you can edit this wording at Settings > Shopper portal > Customize > Language editor > Cancellation request). No notification email is sent to the shopper when a cancellation fails.
Common causes of failure
Shipping has already started (see Which order statuses can be cancelled for each integration? for the conditions per integration)
The order has already been cancelled in the connected system
The payment is "pending" in Shopify (convenience store payment, deferred payment, and so on): Shopify does not allow cancelling orders with a pending payment, so the cancellation from Recustomer also fails (see Cancelling orders paid by convenience store deferred payment fails)
A temporary communication error with the connected system
When you have both a main and a sub cancellation target
If the main target fails, the sub target is not processed (for example, with main = OMS and sub = Shopify, a failure on the OMS side means the Shopify cancellation and automatic refund do not happen either).
If only the sub target fails, the cancellation is treated as successful overall (and the shopper receives the cancellation completion email). In that case, cancel the order manually in the sub system (you can check failures in the cancellation status (sub) column).
What to do
Failed requests are not retried automatically, so cancel and refund the order directly in the connected system.
Because failures are not sent by email, we recommend checking the cancellation request list in the admin dashboard regularly.
The payment method shows as unknown and the refund stays unpaid
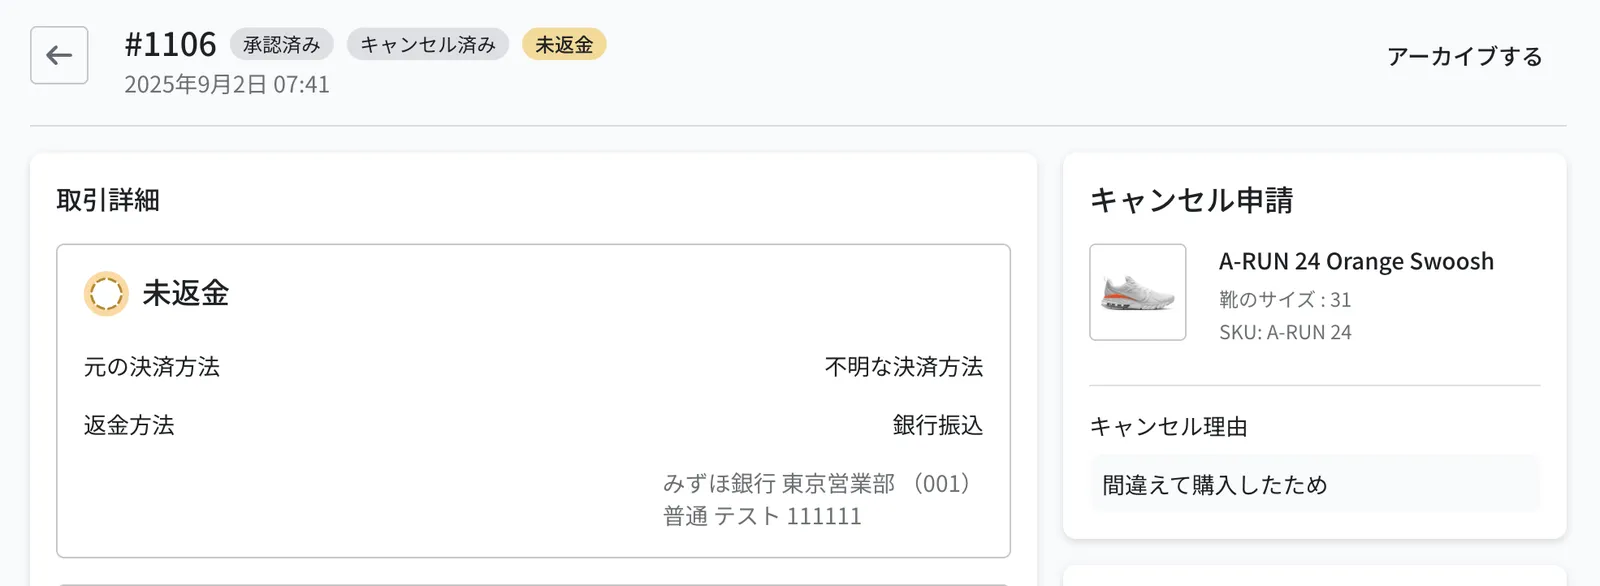
"Unknown payment method" appears in the request details when the order's payment method is not registered in your refund method settings. In that case the refund is treated as a bank transfer: the shopper sees "Refund to a bank account" and is asked to enter their bank details. No automatic refund is made, so the request keeps the unpaid status.
What to do
Register the payment method at Settings > Returns and refunds > Refunds > Refund methods (see 2-7. Refund method settings). If you do not know the payment method key, please contact us.
For requests that have already been submitted, please process the refund manually.
Cancelling orders paid by convenience store deferred payment fails
With payment methods where the shopper pays later, such as convenience store deferred payment, the order stays in a "payment pending" state in Shopify. Shopify does not allow changing a payment-pending order to cancelled, so the cancellation from Recustomer also fails.
If you accept convenience store payments, you can reduce shopper enquiries by explaining on one of the following screens both that cancellation requests are not available for convenience store orders, and that the order is cancelled if the payment deadline passes without payment (how unpaid orders are handled depends on your payment provider's settings).
The cancellation failed screen: Settings > Shopper portal > Customize > Language editor > Cancellation request
The order lookup screen: Settings > Shopper portal > Return and cancellation requests > Notes field at the bottom of the order lookup screen
Even when the cancellation fails, no refund is needed because the shopper has not paid. The order is not cancelled in Recustomer, so cancel it manually in the connected system if necessary.
The request page says the order cannot be found
There are several possible causes.
The order number does not match
The order lookup matches the order number against the email address (or postal code, or name). Check that the order number matches exactly, including any prefix (for example, whether the leading hash is entered).
If you also use NextEngine, the NextEngine order number must be in the same format as Shopify's (including the hash). See NextEngine integration for details.
The order has not synced yet
Orders cannot be found until they appear in the connected system. If you have connected more than one system (for example Shopify plus CROSSMALL), the order must exist in both systems; it will not be found while it exists in only one. If the order was just placed, wait and try again (this can take up to about 30 minutes).
If your setup does not sync immediately, consider adding wording to the lookup screen in the language editor (Settings > Shopper portal > Customize > Language editor), such as "If you have just placed your order, you may not be able to proceed. Please wait about 30 minutes and try again."
The order status mapping is incomplete
If you use ecforce or CROSSMALL and you add a new order status (processing phase) in the connected system without adding it to the Recustomer mapping, orders with that status are not imported and therefore cannot be found. No error is reported, so always update the mapping when you add a status.
The order has no customer information
Orders without an email address or shipping and billing addresses are not imported and cannot be found (this applies to in-store (POS) purchases, for example).